Hello loves! It's finally summertime and I am oooh-so happy. I love everything about summer- the beach, warm sun, cute bathing suits, and beach wavy hair. I spend a lot of time at the pool catching rays, so I have developed the must haves to carry with you for the pool/beach that you most likely have at home! So convenient...
A peek inside my pool bag must haves:
1. Water spritzer. I fill a water spritzer up with cold water with ice cubes when I lay out at the pool or even in my backyard. Whenever I find myself getting too sweaty, I easily spritz myself with the water to cool down. You can also use green tea as well. Green tea has soothing properties that can actually help your skin! Just diffuse tea into hot water, chill it, and put it into the spritz bottle. This is especially good for the face. (Even when you are not laying out, green tea works as a great face refresher throughout the day... especially when it's hot out.)
2. SPF 30+ sunblock for face & body. Non-comedogenic and oil-free, of course! (Acne-prone readers...)
3. Cucumber water. I love to drink cucumber water because it is so refreshing, especially on a hot day! It's so important to remain hydrated while in the sun. The cucumber in the water also helps your skin because of its skin loving vitamins and minerals. The best part is-- when you have finished the water, take the cucumber slices out and lay them on your face. The cucumber can soothe the sunburn on your face and refresh it as well. It's almost rejuvenating.
Here are just a few of my must haves when in the sun. Remember to protect your skin while laying out! Your skin will be happy. :)
Hope you all are having a fabulous summer and have fun! Will post soon...
Relax and enjoy,
Daniela

Friday, May 16, 2014
Monday, April 7, 2014
C'mon Honey, Put Some Honey on Your Face!
I love honey. Honey is a great sweetener to put on anything- oatmeal, english muffins, cereal... and the list goes on. Now here's something new you can put honey on: your face!
Honey is fabulous for skin, especially for acne and wrinkles. Honey is a natural antibacterial, so it's great for treating and preventing acne. Honey opens up pores and cleans whatever gunk is in there. It is full of antioxidants so it is great for your skin's complexion making it glow and plump. The antioxidants also help prevent wrinkles and slow down aging. Convinced yet? Honey is also super moisturizing! Super sweet. (No pun intended)
Honey is probably already in your kitchen, so no need to go out and buy it. If for any reason you do not have it, go make a trip to the grocery store and buy some. Pure honey (like the picture below) should do the trick. You won't regret it.
 Facial instructions: Apply a thin layer to the face. I leave it on for a good amount of time, maybe around 45 minutes. I apply this mask for all three reasons I listed above: to moisturize, help my acne, and for anti-aging. The benefits are endless.
We can all thank the bees.
Thank you bees,
Daniela
Honey is fabulous for skin, especially for acne and wrinkles. Honey is a natural antibacterial, so it's great for treating and preventing acne. Honey opens up pores and cleans whatever gunk is in there. It is full of antioxidants so it is great for your skin's complexion making it glow and plump. The antioxidants also help prevent wrinkles and slow down aging. Convinced yet? Honey is also super moisturizing! Super sweet. (No pun intended)
Honey is probably already in your kitchen, so no need to go out and buy it. If for any reason you do not have it, go make a trip to the grocery store and buy some. Pure honey (like the picture below) should do the trick. You won't regret it.

We can all thank the bees.
Thank you bees,
Daniela
Wednesday, April 2, 2014
New Toner! My Review
Hello my skin care and beauty loves! I know I've been M.I.A for a while, but now I am officially back. Like you all know, I am a college student and the school work is a little stressful. I finally have some down time and have so many new things to share with you all. Can't wait!
Recently, I ran out of my Simple Soothing toner which I ADORED. I've written posts about it in the past and raved about my love for this natural toner and thought I would never find another one like it. Well, sadly, I was forced to find another one recently since I could not find the Simple toner ANYWHERE. I went to two different Targets and it was no where to be found. You could say I had a mini panic attack. I started to look around for other toners, reading the ingredients, seeing if it was natural, and so forth. As I was looking around, I came across a colorful, floral bottle that caught my eye. I started to look into it and see what was in it, and you could say I was impressed. I smelled the toner and it smelled so good! I was hooked. I though to myself, "Why not try it out?" I had nothing to lose. Except a breakout.
This toner is by Alba Botanica and it's called Hawaiian Facial toner with complexion balancing hibiscus. I immediately brought it home and tried it out. First thoughts: "Ooh this smells so good. And feels good too!" It was light and refreshing on my skin, and did not leave a greasy-like "film" on top of my face. It seemed to really clean my skin and get the excess dirt from my face that my face wash failed to remove. I did not find it drying (make sure to follow with face lotion, of course). After about a week of daily usage, I noticed my facial complexion to be better and my skin was balanced. Even though switching from my beloved Simple toner was a drastic change, this new Hawaiian toner really impressed me. I give it a thumbs up!
Like it says on the back of the bottle, "Calm, cool-as-a-cucumber witch hazel and aloe vera purify and minimize pores. Extracts of hibiscus, honeysuckle, passion flower and guava further refine and refresh so skin finishes with a smooth, balanced tone. Even complexion without the shine? How pure-fect! Hypo-allergenic."


Why not give it a try? It was a little on the pricey side ($13). You can buy this at any Target. I would love to hear what you guys think!
Tone away to a Hawaiian escape,
Daniela
Saturday, March 15, 2014
In Love With My Tea Tree Shampoo!
I feel like my hair changes with the seasons. In the winter, my scalp feels dry and tight, and in the summer, my hair feels dry. I feel like I can never keep a steady shampoo that I can use year round throughout the weather changes. It all came to a halt when I was looking around Trader Joes with my mom a few months ago. I would have never thought Trader Joes had a beauty section. Knowing me... a beauty section at any store is just something I refuse to pass up. That's where I saw it- Trader Joes Tea Tree Tingle shampoo. Before you think "Shampoo? From Trader Joes?!" let me give you some background. Since Trader Joes is known for selling natural and organic foods, I thought the shampoo from there would be the same way. I looked at the bottle, and I was right. It contains all organic botanicals and no sulfates. Sulfates are bad for your hair! Sulfates strip your hair of its natural oils and can actually make your hair look dull and dry. Sulfates are just not beneficial to your hair whatsoever, so avoid please! (Shoot for sulfate free conditioner as well.) Sulfate free is the way to go.
Tea tree is amazing for your hair. It naturally cleanses your hair of dandruff and promotes beautiful hair, so it's a must. It leaves your scalp feeling tingly and refreshed after you use it... it feels like it's really working. Ever since I started using Trader Joes Tea Tree Tingle shampoo, my hair has felt noticeably softer and my scalp is less prone to being dry and having dandruff. Most tea tree shampoos on the market are pretty pricey, that's why I fell in love with this shampoo. It was only $4! Straight from Trader Joes, "All of these refreshing products are made for us with organic botanicals, including tea tree oil, peppermint, eucalyptus, rosemary, and thyme. Their scent is energizing, and their effect on your hair and skin is rejuvenating."


Make the change for your hair and switch to all natural, sulfate-free products. Your hair will look healthier and so much more beautiful!
Tea tree & happy hair,
Daniela
Sunday, March 9, 2014
Protect Your Face From Pimples With The Right Sunblock
Since the warmer days are coming up (at least for me) preparing my summer's worth of sunblock is super important. I was just in Puerto Rico last week for my spring break, and I definitely got some sun. I love, love, love the sun. Loving the sun comes with consequences, though, because it comes with premature aging, skin cancer, and also pimples! Even though having a pretty, bronzed face looks good, it doesn't look so good when you have pimples along with it. The sun can actually cause pimples, ESPECIALLY when you use the wrong sunblock for your face that can clog your pores. If you are acne-prone or have sensitive skin... this post is for you. Read on.
When it comes to facial sunblocks, always use one that is meant for the face. If you are acne-prone, you want a facial sunblock that is non-comedogenic, oil-free, and hypoallergenic. If you can't find one that says non-comedogenic, it usually just says "doesn't clog pores" on the bottle. That works too, but not 100% of the time. Stick to the reliable "non-comedogenic" word. It is always your best bet. Making sure your sunblock is oil-free is essential too, because the oils in the lotion can make your skin greasy. When your face gets greasy, it can lead to clogged pores and breakouts. Hypoallergenic helps your skin from getting irritated and getting a reaction from the ingredients in the sunblock.
I always like to have a SPF 15 and 30 facial sunblock in the summer. I use 30 in the beginning when my face is just starting to get color, and then 15 when I want to just deepen my tan. If you are very prone to getting sunburn, go up to 40 or even 70. Whatever you prefer.
I really like Coppertone's facial sunblocks. They are usually oil-free and the bottle says that it won't clog your pores. Stayed tuned for posts about my favorite sunblocks for my skin, and my not so favorites.
Enjoy the sun and stay pimple free!
Daniela
Monday, February 24, 2014
Crazy for Baby Lips
Nothing is more sexy in a girl when she has pretty, soft, kissable lips. In my earlier posts, I did a short post on Lip Care 101 talking about exfoliating your lips and how to moisturize them. Now it's time to talk about a pretty lip balm that moisturizes your lips and makes them look good. Let me also mention it is cheap! Cheap always sounds good to me.
I'm talking Baby Lips in the color Peach Kiss. This makes my lips look shimmery and glossy, yet so smooth. It also smells delicious... I wouldn't say it quite smells like peaches though, but that's just me. The color comes off almost like nude with a peachy golden shimmer finish. This is my go-to when I need a quick touch of color and a little shimmer, but not thick and shiny like a gloss. I've tried other Baby Lips colors, but this is by far my favorite. The other colors are nice, but this one takes the prize. It looks just like something you would buy from MAC or another high end brand. Daniela's beauty rating: A+
Make your lips baby soft and plump. Perfect for the upcoming warmer days :) It will be a beach bag essential.
-Daniela
I'm talking Baby Lips in the color Peach Kiss. This makes my lips look shimmery and glossy, yet so smooth. It also smells delicious... I wouldn't say it quite smells like peaches though, but that's just me. The color comes off almost like nude with a peachy golden shimmer finish. This is my go-to when I need a quick touch of color and a little shimmer, but not thick and shiny like a gloss. I've tried other Baby Lips colors, but this is by far my favorite. The other colors are nice, but this one takes the prize. It looks just like something you would buy from MAC or another high end brand. Daniela's beauty rating: A+
 |
| Here's what the color looks like on white paper and on my hand. You can see the shimmer better on my hand. |

-Daniela
Saturday, February 22, 2014
New Hair Product Overload!
Look at all these fabulous items I just got from KMS California! Can't wait to try these all out and do some hair posts about them... switch things up a bit.

Coming soon...
-Daniela

Coming soon...
-Daniela
Friday, February 21, 2014
Clean Out Your Candle Jars for Smart Organizing!
I don't know about you guys, but usually all my beauty stuff is unorganized. I have 3 bottles of face wash, cotton pads, and lotion bottles everywhere. I try to organize my bathroom every once in a while, but I never know where to put my stuff! Recently, my sister told me she cleaned out her candle jars to use as bathroom storage. I fell in love with the idea. If you are a candle lover (like me) and have unused candles that you want to throw away, think twice! Those pretty glass jars can be used for so much more...
How to clean out your candle jar the right way:
1. First, put your candles in the freezer overnight. (The longer you can keep it in there, the better.)
2. After they have been in the freezer overnight, take a knife and get the wax out. It usually just pops out of the jar. (TIP: DO NOT put the wax into the sink! That can clog it. Throw away in the trash instead.)
3. Get a cooking pot (big enough for your candle jar) and put about an inch of water in there. Make sure the water is not above the candle rim. It has to be below. Get the water to a boil.
2. Once the water is at a boil, place the candle in there. After about a minute or so, take the candle out. TIP: Don't reach your hand in the pot over the heat. Remove the pot from the heat, get a kitchen glove, and carefully remove the candle.
3. Boiling the water is used to help remove the candle wicks from the bottom. With a fork, remove the wick. It may take a few times to get it out since it's usually stuck on the bottom pretty good. Clean the inside with hot water and soap. Also, make sure to remove the candle sticker.
4. After all that cleaning, there's usually more extra residue in the candle jar. I recommend using Goo Gone to help get it off.
Simple as that! Not all candle jars need to be used for bathroom storage, though. You can use cleaned candle jars for growing plants, putting ingredients in there for the kitchen, or just using them as decoration. It's a smart way of recycling and can save you money too. For a beauty guru like me, I can use as much storage as I can for my beauty products. Good luck!
 Recycle my loves,
Daniela
How to clean out your candle jar the right way:
1. First, put your candles in the freezer overnight. (The longer you can keep it in there, the better.)
2. After they have been in the freezer overnight, take a knife and get the wax out. It usually just pops out of the jar. (TIP: DO NOT put the wax into the sink! That can clog it. Throw away in the trash instead.)
3. Get a cooking pot (big enough for your candle jar) and put about an inch of water in there. Make sure the water is not above the candle rim. It has to be below. Get the water to a boil.
2. Once the water is at a boil, place the candle in there. After about a minute or so, take the candle out. TIP: Don't reach your hand in the pot over the heat. Remove the pot from the heat, get a kitchen glove, and carefully remove the candle.
3. Boiling the water is used to help remove the candle wicks from the bottom. With a fork, remove the wick. It may take a few times to get it out since it's usually stuck on the bottom pretty good. Clean the inside with hot water and soap. Also, make sure to remove the candle sticker.
4. After all that cleaning, there's usually more extra residue in the candle jar. I recommend using Goo Gone to help get it off.
Simple as that! Not all candle jars need to be used for bathroom storage, though. You can use cleaned candle jars for growing plants, putting ingredients in there for the kitchen, or just using them as decoration. It's a smart way of recycling and can save you money too. For a beauty guru like me, I can use as much storage as I can for my beauty products. Good luck!

Daniela
Wednesday, February 19, 2014
My Current Acne Mask Obsession!
I have mentioned this mask in my previous posts, and I still can not get enough of it. It is my go-to mask whenever a breakout happens, or just when I want to cleanse my pores and refresh my skin. Before I purchased this mask, I went to see the reviews online, and all of them were positive. I thought to myself, "Why not?" and try it out.
This fab mask is by Peter Thomas Roth called Sulfur Cooling Masque. This mask contains kaolin (oil absorbing clay), eucalyptus (cleans pores and soothes skin), 10% sulfur (acne fighter), and aloe vera (skin hydrator and soother). In my Steaming 101 post, I stated that this mask is perfect for a post-steamed face. This cleans deep and really helps dry out those pimples. If you are an acne-sufferer and struggle with excess oil, this mask is a MUST have. Only downfall: it is on the pricey side. I bought mine for $40 at Ulta. I am on the quest to find cheaper alternatives. Stay tuned.


Mask those pimples away. Xo,
Daniela
Thursday, February 13, 2014
Cystic Pimples... Do's & Don'ts
Cystic pimples: the most painful pimple on the planet. These things hurt. Most people mistake them for normal pimples that can be easily popped. Newsflash: it's harder than you think.
Cystic pimples are "underground" pimples that are beneath the skin and are very sore. If you try to pop the underground pimple, it will actually make it worse and more sore. I remember when I had these, I would try and pop them and that was the worst mistake I could have made. It actually throbs in pain. Ugh.
You can tell if its a cystic pimple if it is hard to the touch, very painful, and no sign of whitehead. The best thing you can do is DO NOT try and pop it. Just don't touch it. My friend had one recently and thought she would try to squeeze it as hard as she could to see if she could pop it. Long story short, she quickly regretted it.
Whenever I have a cystic pimple, I really like to do warm compresses. I put a towel under hot water, and place it on my pimple until the towel gets cold again. Then I reapply the hot water and do it again. It helps bring the pimple to a head. Also, ice cubes on the pimple bring the redness and size down. Both hot & cold remedies work best for cystic pimples. Also, put good pimple medicine on it. I really like Neutrogena Rapid Clear Sore Pimple Gel. It really does the trick for me.
Take that pain away,
Daniela
Tuesday, February 11, 2014
Blush Me Up! Favorite MAC Blushes
Winter time is here (obviously... it is currently snowing outside my window) and nothing completes a perfect look without a hint of pretty blush. Having a paler face in winter is hard-- you can't put on too much bronzer or foundation without it looking like too much. It's always important to not make your face too tan or too dark compared to your skin tone. Always go with lighter face colors so it looks as natural as possible. When it comes to MAC cosmetics, I have found two blushes that have satisfied me for my skin tone in both summer and winter. These colors are so easy and simple. Especially on any skin tone. Lo-o-oveeee.
First, I love MAC Melba. Its a slight mix between peachy and coral with hints of pink. It is matte, so there aren't any shimmers. Love this for a pretty natural look.

Next, I adore MAC Peaches. This is more for summer time, because it is more on the peachy side (more peachy than Melba). It has a pretty tint and gives a nice matte glow. For the winter months, go lightly with this. It still looks gorgeous on paler skin. Peach is pretty on the cheeks, but looks bad if you overdo it. So don't!
 I love the brand MAC and their face blushes/bronzers. These are my two favorites from this brand and have never disappointed. Just a little on the apples of your checks and bam!
Love,
Daniela
First, I love MAC Melba. Its a slight mix between peachy and coral with hints of pink. It is matte, so there aren't any shimmers. Love this for a pretty natural look.
Next, I adore MAC Peaches. This is more for summer time, because it is more on the peachy side (more peachy than Melba). It has a pretty tint and gives a nice matte glow. For the winter months, go lightly with this. It still looks gorgeous on paler skin. Peach is pretty on the cheeks, but looks bad if you overdo it. So don't!
Love,
Daniela
Monday, February 3, 2014
Bronzer Basics... How To Naturally Get That Bronzed Babe Look
I think it's safe to say that almost everyone loves to wear bronzer. Having a nice, golden glow is super flattering on anyone. A pretty glow is the way to go. :)
For me, my makeup routine is not complete without a little touch of bronzer and blush. It highlights/contours the face and gives it color. There are different ways of applying bronzer-- I'll explain how. To begin, don't overdo it with the bronzer. Some girls get desperate for that tan and will overdo the color (sometimes not matching their neck!). Remember that less is more! If you have an all over face color, like my all time favorite Bare Minerals Faux Tan powder, then that can lightly be applied on the forehead, checks, chin, nose. If you have a stronger pigmented bronzer, like Lorac Hot Flash, then you apply the bronzer where the sun naturally falls: the forehead, cheeks, and below your cheeks towards the jaw. Let me give you a visual... Consider the bronzer to be applied in an almost "3" shape.

For me, my makeup routine is not complete without a little touch of bronzer and blush. It highlights/contours the face and gives it color. There are different ways of applying bronzer-- I'll explain how. To begin, don't overdo it with the bronzer. Some girls get desperate for that tan and will overdo the color (sometimes not matching their neck!). Remember that less is more! If you have an all over face color, like my all time favorite Bare Minerals Faux Tan powder, then that can lightly be applied on the forehead, checks, chin, nose. If you have a stronger pigmented bronzer, like Lorac Hot Flash, then you apply the bronzer where the sun naturally falls: the forehead, cheeks, and below your cheeks towards the jaw. Let me give you a visual... Consider the bronzer to be applied in an almost "3" shape.
No matter the face shape, applying bronzer in these areas looks flattering on anyone. It really defines the face and cheek bones. Bronzer is supposed to look natural. If it looks like you are noticeably wearing bronzer, then it may be too much. Good luck.
I will be writing a post soon about blush basics. Stay tuned.
-Daniela
Sunday, February 2, 2014
Breakout No-No's
Having a breakout is one of the worst feelings in the world. I remember I used to have really bad breakouts in high school- so bad I didn't want to go to school. Even though my mom said it wasn't that bad, it was bad to me. I just wanted it to go away! After many attempts to zap away my breakout quick, I learned what worked, and what didn't. No breakout is healed overnight, it all comes with patience.
First, please promise me that you will not pick at your face! You know how I feel about that... it's very bad. You can make the breakout worse. Leave it alone and let it heal. Secondly, drink lots of water. Drinking plenty of water is always the best solution. Also, try not to stress! Whenever I get really stressed out, I breakout. Relax, take deep breaths, drink tea and get plenty of rest.
Also, don't overkill it. Don't get obsessive with the face masks, topical treatments, zip zappers, and so on. I recommend maybe doing one mask, but then leave it alone after that. One time I did like 4 masks during a breakout and it made it so much worse. Your skin needs to heal and repair itself naturally. Face washing is only necessary twice daily.
Try to keep low on the makeup too. The more layering of makeup, the more pimples to come.
Stay calm & breakout free,
Daniela
Thursday, January 30, 2014
When Is a Good Time To Start Wearing Eye Cream?
When you think of eye cream, you probably think its purpose is to help wrinkles look, well, less wrinkly. Well, surprisingly, experts say you are supposed to apply eye cream long before you even get wrinkles.
Having parents from Puerto Rico, it is safe to say that I adore the sun. Every time I visit Puerto Rico, I always leave with a killer tan. Before that tan though, I always get sunburnt and usually peel (even with SPF on). Especially on my face. Yes, the sun is that strong. After a few bad sunburns on my face, I can only think to myself, "Is this healthy? Am I going to get wrinkles?" I am actually that paranoid about my skin. After a little research, it said an appropriate time to start using eye cream was in your early 20's. I bought some and still currently am, and I am 19 years old. You can start with cheap ones of course, nothing fancy. I believe my eye cream was around $8 from TJ Maxx. The beauty section at TJ Maxx is pretty awesome.
I would suggest to start using eye cream around 19,20,21,22, and definitely before any time after that. You start developing eye wrinkles around your mid to late twenties, so putting on eye cream before that is all preventive. Preventing is always a good idea. Don't you want to say young and fab forever?
The eye cream I use is by Ellen Tracy called Advanced Eye Lifting Cream. This is the $8 one I purchased from TJ Maxx. Not a bad cost, and it smells heavenly. It also looks pretty fancy too, if you ask me.

**ALWAYS remember, the biggest prevention from wrinkles is wearing SPF. I'm not going to tell you to completely avoid the sun, but be safe with it. Don't overdo it.
Wrinkle free,
Daniela
Tuesday, January 28, 2014
Brrr.... Keep Skin Moisturized During These Cold Days!
I don't know about you guys, but here in the East coast, it's been freezing. It's supposed to snow sometime tonight and I'm dreading it. I am definitely not a cold weather type of girl. I love the sun! You can't blame a Puerto Rican, right?
It is so important to moisturize your skin during this winter season. My skin feels so tight when I go outside and it burns! Sometimes my moisturizer just isn't enough. I have to go above and beyond.
Well, of course, I recommend a coconut oil mask to hydrate your skin. Also, I love to put honey on my face. Not only is honey sweet, but it is extra moisturizing for your skin and full of antioxidants. It is also a great acne-fighter. Egg yolk also has moisturizing properties. I like to separate the egg white and the yolk and scramble the yolk then apply it to my face.
Also, remember aloe vera is very moisturizing as well! Drink lots & lots of water too. And tea. :)
Brrrr,
Daniela
Tuesday, January 21, 2014
Coco Oil... The Obsession Continues
One of my very first posts in this blog was my post on the amazing benefits of coconut oil. You can say I'm obsessed, to say the least. I have been so happy with the results coco oil has done for my skin- it has cleared it up, made it so soft, and made it look smooth and glowing. For more info on coconut oil for the face, check out my post "Why I Love Coconut Oil".
Little did you know, coconut oil can be used for so much more than just face. I put coconut oil on my lashes before I go to sleep, because it nourishes them and makes them soft. I only put a light layer because if you put too much, it can irritate your beautiful eyes.
You can also use coco oil for a fabulous hair mask. If you notice your hair to start getting brittle at the ends or you just can feel it's dry, I definitely recommend to use a coco hair mask! Make sure the oil is fully melted before you apply it anywhere. After the oil has been melted, I like to apply the oil from the bottom of the hair up. If you have dry scalp and/or dandruff, then the oil will be beneficial for your scalp area. Just a warning: since you are putting oil in your hair, it will obviously make your hair a little oily. It make take 2 washes to fully get all the oil out. I usually do 2 shampoo washes to rinse out the mask. Be light on the oil though- a little goes a long way. Remember: the more oil you put, the oilier your hair will be! After I rinse the hair mask out, my hair is so soft and smells like coconuts. How much better can that get?
I'm not done yet! You can also use coconut oil on your lips! Coco oil works as a natural lip balm, and really hydrates those lips. In addition, it can work as an eye makeup remover and can be applied on dry skin. Coconut oil absorbs quickly so it shouldn't leave you with a greasy after feel. These are the very few uses of coco oil and I encourage you to try them! I'm sure there are so many more ways you could use the oil, but here are just my favs.
I bought my coconut oil at Trader Joes. It's around $8 I believe. It will also last you forever. When buying coconut oil for beauty reasons, make sure it is organic and virgin.


Coco oil 4 life,
Daniela
Saturday, January 18, 2014
Scrubby Dub Dub On The Face: Exfoliation Tips
~Before we get into exfoliation, I want to apologize for not being so frequent with my posts. Being a college student can be overwhelming and I'm trying to make time for my blog as much as I can. Hopefully you all understand and I can't wait to share my new posts in the future. :)
Exfoliation is key to a smooth, even-complexioned face. Exfoliation rids your skin of dead skin cells and allows your face to glow and look alive. I personally like to exfoliate around twice a week, sometimes once. Over exfoliating is not a good thing because it can dry out your face and actually promote more acne. Just a gentle, simple exfoliation once/twice a week should do the trick. Depending on your skin type, some people may like to do it two/three times a week. That should be the max though! Don't overdo it. Your skin won't thank you.
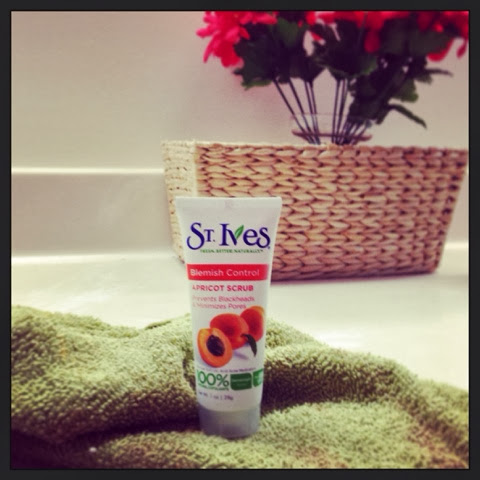
There are two different ways to go about exfoliating. You can pick to use a deep exfoliator, which you can buy at the store or make at home, as your weekly exfoliation. For example, I use St. Ives Apricot Scrub as my once-twice a week exfoliator. It's harsh enough to exfoliate my face but not too gentle where it doesn't do anything. Or, you can use a daily cleanser with light exfoliants in it, like Aveeno Skin Brightening scrub that gently exfoliates your face but nothing too harsh. I've used a daily gentle exfoliator, but I would rather use a daily cream cleanser and do a once/twice a week exfoliation with a good scrub. That's just me though... everyones different.
I really like St. Ives Apricot Scrub. This is the only product that I have that contains salicylic acid, but I really like the results. I recommend this scrub for people with acne-prone/oily skin. If you have sensitive skin, I recommend St. Ives Green Tea scrub. It's gentler and has soothing ingredients. If you want to make one at home, then try a brown sugar scrub with some coconut oil. It works wonders.
 *Make sure after you exfoliate that you don't forget to moisturize! Moisturizing hydrates the new layer of skin.
Scrub scrub,
Daniela
Exfoliation is key to a smooth, even-complexioned face. Exfoliation rids your skin of dead skin cells and allows your face to glow and look alive. I personally like to exfoliate around twice a week, sometimes once. Over exfoliating is not a good thing because it can dry out your face and actually promote more acne. Just a gentle, simple exfoliation once/twice a week should do the trick. Depending on your skin type, some people may like to do it two/three times a week. That should be the max though! Don't overdo it. Your skin won't thank you.
There are two different ways to go about exfoliating. You can pick to use a deep exfoliator, which you can buy at the store or make at home, as your weekly exfoliation. For example, I use St. Ives Apricot Scrub as my once-twice a week exfoliator. It's harsh enough to exfoliate my face but not too gentle where it doesn't do anything. Or, you can use a daily cleanser with light exfoliants in it, like Aveeno Skin Brightening scrub that gently exfoliates your face but nothing too harsh. I've used a daily gentle exfoliator, but I would rather use a daily cream cleanser and do a once/twice a week exfoliation with a good scrub. That's just me though... everyones different.
I really like St. Ives Apricot Scrub. This is the only product that I have that contains salicylic acid, but I really like the results. I recommend this scrub for people with acne-prone/oily skin. If you have sensitive skin, I recommend St. Ives Green Tea scrub. It's gentler and has soothing ingredients. If you want to make one at home, then try a brown sugar scrub with some coconut oil. It works wonders.
Scrub scrub,
Daniela
Wednesday, January 15, 2014
What To Look For In A Toner... So Important!
As you all know, toning is a very essential step in the CTM routine (cleanse, tone, moisturize). Toning helps balance your skins complexion, pH levels, and helps clean any remaining oil and makeup your cleanser did not take care of. To me, a toner is SO important! It's so funny because a few days ago, my friend had asked me what a toner was (she saw me using it). I looked at her like, "Excuuuse me?" Most people completely forget about it.
If you're still not convinced, let me give you an example: I will use a makeup removing wipe to get my eye/face makeup off, then proceed with my Burt's Bees cleanser. Still, after that, my toner takes off leftover makeup and dirt I didn't even know was there. I thought just the makeup wipe and cleanser did the trick, but apparently it's not enough! Sometimes you may think you got everything off, but you didn't. Even for guys! My dad came in my bathroom one night and saw I was toning my face and asked if he could try. He looked at the cotton pad after, saw it was a little dirty, and freaked out. He didn't know it lingered! May sound gross but trust me, everyone has it.
The amazing benefits from toning honestly comes from what toner you use. I've used such harsh toners that it actually did the opposite of balancing my pH levels and complexion. It completely dried out my face, made it burn, and actually gave me more pimples. Some toners left an oil slick on my face that made me want to wash my face again. So, after much experimentation, I've learned that natural toners are the best. (The natural way is always the best)
You can use green tea toners, witch hazel toners, cucumber toners, I could name them all. It all depends on your skin type. A few examples:
-Acne prone/oily skin: Witch hazel, green tea
-Sensitive/dry: Cucumber, green tea, chamomile, rosewater
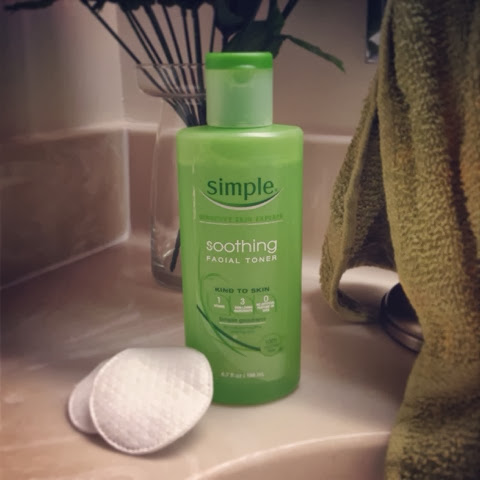
My biggest thing is to make sure the toner is ALCOHOL FREE. Alcohol dries out your face and disrupts your skin's pH levels. Alcohol is fun for other occasions, but not for your precious face. My toner that I currently love is by Simple called soothing facial toner. Alcohol-free, all natural, contains no harsh irritants, and has witch hazel and chamomile. Works great for my skin and keeps its nice and smooth. It's a must!! Can I also add that it's affordable? :)
Never, EVER forget to tone! Xo
-Daniela
Tuesday, January 14, 2014
Email Me!
I would love to hear from my readers about their skincare journeys- what products worked for you, what products didn't, your skincare ritual, and more! Also, if you have a request for a blog post, I would love to hear that also. Gives me new ideas!
danielaskincarebliss@gmail.com
Xo,
Daniela
Monday, January 13, 2014
My Dream Cream (Topical Treatment)
I have tried many topical products in my day, but one of them has really earned the title of the "dream cream". Well, it's not necessarily a cream, but a gel... and I couldn't really find a catchy phrase rhyming with gel so I will stick to cream. Anyway, this gel is fabulous and I want to tell everyone who struggles with acne to get this. It's important to remember that everyone's skin is different, but I've recommended this gel to a few of my friends, and all of them have had awesome reviews. It's called Acanya.
Let me begin to say that Retinoid topical treatments and I have not always been friends. I had a pretty ugly reaction to it. I know in the beginning of a topical treatment it gets worse before it gets better, but for this I could not wait any longer. My skin began to breakout in a reddish rash, and it got bumpy and dry. I immediately got off of it and never looked back. Even though this did not necessarily work for me, I have heard that products containing Retinoid has worked great for other people. Me not one of them. Yikes.
So one day my dermatologist gave me a sample of something that would save my skin forever. Like I said earlier, the name is Acanya, which is a topical antibiotic for acne. It is pretty mild and consists of a mixture of clindamycin and benzoyl peroxide. I have been using this gel for about 4 years now, and it still works wonders for me. Before bed I'll put a little on all over my face, or I'll just put it on a few pimples. A little goes a long way! I wake up with significantly reduced redness and my pimples are almost unnoticeable. Now, on the other hand, if my sister were to try this, this would be a big no-no. Her skin does not react well to benzoyl. Remember, even though this works for me it might not work for you, especially if your skin is sensitive!!
Good luck everyone. Keep in mind that you have to go through a few bad products before you find out which one works best for you.
Love,
-Daniela
Sunday, January 12, 2014
Let's Get Steamy with Facial Steaming 101
Steaming your face at home is like treating yourself to a mini facial. Steaming can be fabulous for your skin, only if you do it the right way. Surprisingly I am not too big on steaming, but when I actually do it, I can definitely see the benefits. Steaming opens up the pores and helps get dirt out. It can also increase circulation to give yourself that "glow" people live for. Steaming causes your face to sweat which means it is releasing toxins from your body and face. That is definitely a plus. Make sure you don't make the water too hot, or put your face too close to the steam, because you could potentially burn your skin. So let's avoid that at all costs! I would say make sure the temperature is around 110 degrees. If you have a facial steamer already bought with a set temperature, you should be good and ready to go.
Before you steam, make sure to wash your face. I like to use my Burt's Bees cleanser to clean and prepare my skin. After I cleanse my face, I gently pat dry it with a towel. Then, I put my face on my facial steamer and allow my skin to stay there for about 5-7 minutes. You don't want to be under the steam for too long. If it gets too hot, take breaks for the steam for a few seconds to cool off. Right after I remove my face from the steam, I check to see if I brought any of my pimples to the surface. Whiteheads, in particular. (Check out my Don't Pick At Your Face! But If You Really Can't Help It... post for more info.) I mainly stick with trying to get blackheads out from my nose. Those are easier to remove, especially with the steam. Be careful not to try and pop pimples that are not ready! If you do, you are essentially making this facial worse for your skin. After a few blackhead extractions, I like to apply a sulfur mask on my face. If the pores are still open from the steam, this allows the mask to enter the pores easily and help fight whatever bacteria is in there. For people with oily and acne prone skin, I do recommend a sulfur mask. Sulfur dries out the pimples. For people with sensitive skin or dry skin, I recommend a gentler mask, like a honey or cucumber mask. For my acne sufferers, I recommend the Peter Thomas Roth Sulfur Cooling Mask. It's a little pricey at around $40, but I think it's completely worth it.

Before you steam, make sure to wash your face. I like to use my Burt's Bees cleanser to clean and prepare my skin. After I cleanse my face, I gently pat dry it with a towel. Then, I put my face on my facial steamer and allow my skin to stay there for about 5-7 minutes. You don't want to be under the steam for too long. If it gets too hot, take breaks for the steam for a few seconds to cool off. Right after I remove my face from the steam, I check to see if I brought any of my pimples to the surface. Whiteheads, in particular. (Check out my Don't Pick At Your Face! But If You Really Can't Help It... post for more info.) I mainly stick with trying to get blackheads out from my nose. Those are easier to remove, especially with the steam. Be careful not to try and pop pimples that are not ready! If you do, you are essentially making this facial worse for your skin. After a few blackhead extractions, I like to apply a sulfur mask on my face. If the pores are still open from the steam, this allows the mask to enter the pores easily and help fight whatever bacteria is in there. For people with oily and acne prone skin, I do recommend a sulfur mask. Sulfur dries out the pimples. For people with sensitive skin or dry skin, I recommend a gentler mask, like a honey or cucumber mask. For my acne sufferers, I recommend the Peter Thomas Roth Sulfur Cooling Mask. It's a little pricey at around $40, but I think it's completely worth it.
After the mask has been on the skin for about 10 minutes, remove it with water and then
proceed with toning and moisturizing. Good luck!
-DanielaFriday, January 10, 2014
Let Your Skin Breathe....
Today is such a rainy day. I woke up late, still in my pajamas, hanging on the couch (blogging, of course). Days like this I let my pores breathe. It can be said that wearing makeup everyday does contribute to causing breakouts, so what can you do? Let your face stay all natural every once in a while. Especially if you are undergoing a current breakout, step away from the heavy foundations and powders so your skin can recuperate and heal. I know not being able to coverup the breakout with makeup can be hard (especially if you're going out), so then try lighter makeup than what you usually wear. Light powder, a little concealer. Nothing too heavy. I like to only wear face makeup when I really have to.
I wanted to make this post short, but sweet. Have a wonderful, relaxed day. :)
-Daniela
Thursday, January 9, 2014
Did You Know Theres A Shampoo For Your Makeup Brushes? Clean Them!
Makeup brushes get dirty super fast... you would be surprised. Think about it: you're reusing the makeup brush everyday and it collects dirt, oil, and makeup every time you use it. Just like we wash our hair, pillow covers, and face towels, it's important to clean your brushes. In college, it is harder for me to clean my brushes regularly compared to when I did it at home almost religiously. "Religiously" as in once every two weeks. If you do it too often, you may dry out the makeup brush bristles and they can wear out quicker. If you do it every now and then (when you notice them getting dirty) your face will benefit from it and you won't ruin your brushes. That is... if you clean them the correct way, of course!
I love my Brush Shampoo from e.l.f. It's only $3 and really cleans all that makeup and dirt out of those brushes. If you don't want to use store bought shampoo, you can make your own at home. You can use baby shampoo, for example. It's gentle enough to not dry out the brush.
My brush cleaning ritual: First, make sure your sink is clean. Next, lay out all your brushes on top of a towel. Fill up your sink halfway with warmish-lukewarm water. Next, pour some of the brush shampoo into the water (a dime sized amount) and mix it around with your hand. Put your first makeup brush in there (I like to do this one at a time), applying a little more shampoo on the brush before (only a pea size amount). Put it in the water and gently squeeze the brush so all the makeup comes out of it. I like to gently twist the brush head against the bottom of the sink because it opens up the brush and gets excess dirt and makeup out of it. After most of the makeup has come out, turn on the water and rinse the brush one last final time to make sure all of the dirt and soap has come out. Then you can finally apply it on the towel to dry. Here's a tip: I like to open up some of the brush with my fingers when it's out to dry so air can get inside the brush. Make sure to drain the sink water in between each brush cleansing because the water can get really dirty. You don't want to put a new brush to clean in dirty water. Bad.
Hopefully this was not too complicated. I know there are many ways to properly clean makeup brushes, but this is my way that works just fabulously. Clean brushes feel good against the skin and can prevent future breakouts. Prevent, prevent, prevent!

Have fun cleaning!
-Daniela
Wednesday, January 8, 2014
The Award For Best BB Cream Ever Goes To...
It seems like BB creams are the new thing now. About every makeup brand out there has a new one. When I was in desperate need of a new foundation, I thought about buying myself one of these popular BB creams that these commercials and magazines boast about. After looking at all the expensive ones at Ulta, I walked to the drugstore section (I usually try to avoid drugstore face makeup) for a cheaper, yet good quality alternative. I came across Physician's Formula and noticed they just came out with a BB cream that was non-comedogenic. This was a miracle! It seemed like all the other BB creams I saw did not have non-comedogenic on the box, which was a no-no for me. In addition, this BB cream is oil-free, so people with oily skin, have no fear! Even if you don't have oily skin, I always recommend oil-free products. Makeup can get oily on it's own throughout the day, and its not always your skins fault. It's thick enough where it covers your imperfections, but not too thick where it looks cakey (like other foundations). Non-comedogenic, oil-free, and has SPF? Count me in!
I have gone through three bottles of this BB cream, and I've noticed my skin has cleared and looks matte about all day. It's long lasting and can be used year round, even at the pool if you want a SPF and makeup duo. I've got my sister hooked, and my roommate is about to buy one. When I go home from college, my parents always notice how my skin looks smooth and clear! Makes a girl feel good. I can only thank the BB cream. :) It costs around $15 and can be purchased at most drugstores.
I like to pat some of my Clinique face powder on top of the BB cream to make it look matte. Then I follow up with some bronzer and blush.


BB cream on,
Daniela
Tuesday, January 7, 2014
Change Your Pillow & Face Towels!
Imagine... you finally get in your bed at night with a nice, cleansed face, and you rest your head upon your soft pillow. Little did you know the soft pillow had bacteria, oils from your hair, and dead skin. Your face is laying on top of this. Gross!
Most people don't think pillows can actually cause acne. Ever since I learned that, I've tried to change my pillow case every week. I've noticed that if I don't switch out my pillow case for a while, I wake up with a few new pimples. Never a fun feeling. Make sure you switch out your pillow case!
In addition to pillows, also make sure to switch out your face towels. Your face towels can also hold bacteria and makeup (and they can start to smell bad, too!). So when you dry off your face with that towel, you are essentially putting that icky stuff on your face. That's a big no-no. I like to switch my face towel, like my pillow, once a week. Preventing breakouts is the smartest thing you can do.
What I like to do: I try to have an extra pillow case ready in addition to the one I am currently using. That way I don't have to wash the same pillow case every week. That sounds like too much work. Plan ahead! (with face towels, too.)
Prevent!
-Daniela
Monday, January 6, 2014
Lip Care 101
I thought I would do a short post on lip care 101. I know the winter season can be harsh to the lips, so make sure to pamper them as much as your face! I recommend to exfoliate your lips once a week. It rids your lips of dead skin cells that can make it looked chapped and flaky. I love the e.l.f Lip Exfoliator ($3 @ Target). After exfoliation, apply an extra moisturizing lip balm with SPF. Remember, lips can get sunburnt too! I love MAC's Lip Conditioner Stick with SPF 15. These two products make a great combo for beautiful, soft lips (especially during this harsh winter season!)
 Xo,
Xo,
Daniela
Daniela
Need To Revive Those Eyes?
Puffy/baggy eyes can be caused by a lot of things, such as lack of sleep and stress. I sometimes find myself having puffy eyes when I wake up for class because my sleep schedule is so off (can you really blame me? it's college!). So, I have two little tips to share with you all to de-puff those beautiful eyes of yours.
Tip Numero Uno: My mom actually swears to this trick, especially when I complain about having puffy eyes in the morning. Pour some water over a spoon, then stick it in the freezer for about 2 minutes. After the 2 minutes are up, the spoon should be really cold (obviously). Stick the curved part of the spoon underneath the eyes for as long as you can stand. If the spoon loses its coldness, stick it back in the freezer. The cold spoon will awaken your eyes and make them look brighter. Trust me, it works!
Tip Numero Dos: Chamomile bags. Chamomile works as an anti-inflammatory so it can help soothe the eyes. This is for a time where you are not in a rush, because you have to lay with them on your eyes for about 5-10 minutes. I like to steep them in hot water, and then apply the warm tea bags on my eyes after. I like to lay with them on for as long as I can lay still. Best part? You get chamomile tea to drink after! (or before). Yum.
Simple came out with a really nice revitalizing under eye roll-on. It is a good pick-me-up to put on throughout the day. It's refreshing and cooling under the eyes. My mom and I love it.
SO, after you do these tricks, what else can you do to really make those eyes pop? Makeup, of course! (Sorry boys, if you are reading...) The Pixi Crayon Combo "Wide Awake" for the eyes is a miracle product. One side has a matte nude to brighten, and the other side has a glowing cream to lighten. It really does make the eyes look open and awake. My aunt, mom, and cousin actually are obsessed with this product. I am beginning to be too.

You can buy it at Target for around $16. For a cheaper alternative, e.l.f has good under eye makeup as well.
Hopefully these tips will help awaken your eyes and make them beautiful. Remember to relax, de-stress, and get a good amount of sleep!
Revitalize,
Daniela
Tip Numero Uno: My mom actually swears to this trick, especially when I complain about having puffy eyes in the morning. Pour some water over a spoon, then stick it in the freezer for about 2 minutes. After the 2 minutes are up, the spoon should be really cold (obviously). Stick the curved part of the spoon underneath the eyes for as long as you can stand. If the spoon loses its coldness, stick it back in the freezer. The cold spoon will awaken your eyes and make them look brighter. Trust me, it works!
Tip Numero Dos: Chamomile bags. Chamomile works as an anti-inflammatory so it can help soothe the eyes. This is for a time where you are not in a rush, because you have to lay with them on your eyes for about 5-10 minutes. I like to steep them in hot water, and then apply the warm tea bags on my eyes after. I like to lay with them on for as long as I can lay still. Best part? You get chamomile tea to drink after! (or before). Yum.
Simple came out with a really nice revitalizing under eye roll-on. It is a good pick-me-up to put on throughout the day. It's refreshing and cooling under the eyes. My mom and I love it.
SO, after you do these tricks, what else can you do to really make those eyes pop? Makeup, of course! (Sorry boys, if you are reading...) The Pixi Crayon Combo "Wide Awake" for the eyes is a miracle product. One side has a matte nude to brighten, and the other side has a glowing cream to lighten. It really does make the eyes look open and awake. My aunt, mom, and cousin actually are obsessed with this product. I am beginning to be too.
You can buy it at Target for around $16. For a cheaper alternative, e.l.f has good under eye makeup as well.
Hopefully these tips will help awaken your eyes and make them beautiful. Remember to relax, de-stress, and get a good amount of sleep!
Revitalize,
Daniela
Sunday, January 5, 2014
Have You Figured Out Your Skin Type? *Basics*
Some people may know the answer to this without questioning it, and others may not even know what skin type means. If you think you know, or don't know at all, hopefully I can give you some useful criteria that will lead you in the right direction! Skin type is important to know because there are so many acne remedies and products specialized for specific skin types. So let's get started:
- NORMAL: No signs of flaking skin or oiliness. The complexion should look normal and soft.
- OILY: If you have oily skin, then your t-zone will normally look shiny and your pores might look more enlarged then normal.
- DRY: This should be pretty straightforward. Your skin should feel tight and dry. Your skin may flake or be red in some areas due to dryness. Moisturizing is so important for this skin type!
- COMBINATION: A mix of all these above. Oily in some areas, dry in some areas. Most common skin type.
Not quite done yet! Your skin can additionally fall under 2 more categories: SENSITIVE and ACNE-PRONE. With sensitive skin, you have to be careful with what you put on your face because it can cause a reaction. For acne-prone, well, you are prone to acne. Technology has been so awesome nowadays where you can actually take a skin type quiz online and it can direct you to products best for your skin. How awesome! So simple.
Throughout the future of this blog, I will try and post specific tips for people with a specific skin type so everyone gets the attention they need. :)
Xo,
Daniela
My Favorite Homemade Pimple Remedies
Pimples suck. No one likes a big pimple thats too noticeable to cover up. So, when the big, red bump of joy happens, what can you do to kill it? These are my all time favorite pimple killers that hopefully you will begin to love as much as I do. The best thing about it is that the ingredients should be right in your house!
Pimple Remedy #1: Uncoated aspirin mixed with water. Take an aspirin and put it in a little dish. Add a little water where it makes it into a paste like substance. Get a q-tip, mix it well, and apply the white paste on whatever pimples you have. Aspirin dries out the pimple and takes some redness out. It's an anti-inflammatory! Leave it on for as long as you can. Usually I just wait for it to flake off on its own.


Pimple Remedy #2: Baking soda mixed with water. Same directions as above, but just with baking soda instead of aspirin.
Pimple Remedy #2: Baking soda mixed with water. Same directions as above, but just with baking soda instead of aspirin.
After I pop a pimple and the pore is open, I dilute a little tea tree oil with water and apply some on the pore. The tea tree oil contains disinfecting and soothing properties. Perfect for a post-pop treatment!
Always remember to be gentle with the face!
-Daniela
Saturday, January 4, 2014
Don't Pick At Your Face! But If You Really Can't Help It...
I know resisting to pop a pimple is the hardest thing someone can do. I can't even resist it sometimes when it's right in front of me, ready to go. So, I am going to try and advise you to NOT pick at your face. If you are still not going to listen to me, then I have some advice to help bring down the mess that you cause on your face when you actually do it.
Touching/Picking Your Face Basics:
So if you really have a burning desire to pick at your face, make sure to at least wash your hands before! Put your hands under warm water, use soap, the whole shabang. When you go at your face with dirty fingers, you can actually cause more pimples to form on your face from the bacteria and oils from your hands. So you're actually doing more harm then good. Clean fingers are always a better scenario.
If you want to go a step above that and be more hygienic to your face, wash your hands then cover your fingers with a tissue or with cotton pads (like the picture below) so your fingers won't even touch your face! How good does that sound?
 Make sure when you pop the pimple, you look to see that it has a whitehead. That is the biggest indicator that it is ready to be popped. Trust me, if there is not head, don't even bother. You attempting to push it up will actually be doing the opposite- you will be pushing the dirt further into the pore and that can lead to an infection. If you do end up popping the pimple (successfully, that is), always put some astringent on the open pore afterwards so it does not get infected. Then, follow up with an ice cube to ease the redness or put some pimple medicine on it. Done and done.
Touching/Picking Your Face Basics:
So if you really have a burning desire to pick at your face, make sure to at least wash your hands before! Put your hands under warm water, use soap, the whole shabang. When you go at your face with dirty fingers, you can actually cause more pimples to form on your face from the bacteria and oils from your hands. So you're actually doing more harm then good. Clean fingers are always a better scenario.
If you want to go a step above that and be more hygienic to your face, wash your hands then cover your fingers with a tissue or with cotton pads (like the picture below) so your fingers won't even touch your face! How good does that sound?

Those are the necessary steps to successfully pop a READY pimple. If you can resist, that is probably your best option. My skin has been so much clearer when I decided to stop picking at my face.
Resist!
-Daniela
Friday, January 3, 2014
Best Face Lotion That Anyone Can Use
Lotions are tricky. I have tried so many lotions that have either made my face super shiny, break out, or just didn't do the trick at all. After I learned about what the term non-comedogenic meant, I was out to find the best lotion I could find. When looking for a face lotion, always make sure it's non-comedogenic (to recap, this means it will not give you pimples). That way you know it will not break you out, and that it's only job is to keep your skin soft and hydrated. Also, for people with oily skin (me being one of them) I would look for a lotion that is oil-free. It can amaze you how much a face lotion can really make your appearance look shiny.. almost greasy. Last but not least, I do recommend a face lotion without fragrance. I know a nice smelling lotion always seems ideal, but unfortunately it can cause a bad reaction on your face, especially if you have sensitive skin.
So... after spilling out all the information you need to know, let me now tell you what my all time favorite face lotion is. This lotion can be used for both genders because the best part is that it's fragrance free, oil-free, non-comedogenic, AND alcohol free. It does not get much better than that. Nothing fancy... just face lotion.
Neutrogena Oil-Free Moisture- Drugstores $10
> It comes in 4 different types. Sensitive skin, combination skin, SPF 15 and SPF 35.

Remember to apply your face lotion after you wash your face. CTM! For men, you can also apply after shaving.
This lotion is straightforward with its job and has kept my skin moisturized for about 3 years now. I am currently on my third bottle. I like to use the combination skin lotion for my skin type.
Hydrated (and clear) skin is happy skin! It will show too. No one wants a dry face anyway :)
-Daniela
So... after spilling out all the information you need to know, let me now tell you what my all time favorite face lotion is. This lotion can be used for both genders because the best part is that it's fragrance free, oil-free, non-comedogenic, AND alcohol free. It does not get much better than that. Nothing fancy... just face lotion.
Neutrogena Oil-Free Moisture- Drugstores $10
> It comes in 4 different types. Sensitive skin, combination skin, SPF 15 and SPF 35.
Remember to apply your face lotion after you wash your face. CTM! For men, you can also apply after shaving.
This lotion is straightforward with its job and has kept my skin moisturized for about 3 years now. I am currently on my third bottle. I like to use the combination skin lotion for my skin type.
Hydrated (and clear) skin is happy skin! It will show too. No one wants a dry face anyway :)
-Daniela
Say Aloe-ha to Aloe!
When you think of the word aloe vera, do you think of the cool jelly stuff you slather on your body when you have a terrible sunburn? Well, not anymore. Aloe vera is not only beneficial for your sunburn, but also works as a acne fighter and moisturizer! When applied on the face, it can reduce swelling, inflammation and redness that comes with acne. If you apply aloe vera on your face about everyday, it can also prevent future outbreaks. Aloe vera has anti-bacterial properties and can reduce scarring and stimulate cell growth.
It's best to use a real aloe vera leaf for your face since you know its 100% natural. If you are too lazy to grow this plant (like me) I advise to buy a bottle that says it is 100% pure aloe vera with no additional chemicals or fragrances.
What I do: In the summer, I used to replace my face lotion with aloe vera every night. I could tell my acne was better and my skin was soft! It refreshed my skin, helped the sunburn on my face from the daily summer sun, AND fought my acne. Best skin care product ever.
Good luck!
Daniela

Thursday, January 2, 2014
Green Tea is Everything
Ok... so maybe green tea isn't everything but I don't think I could live without it. When I first started drinking green tea, I just drank it for the taste. After about the first 30 cups of green tea, I can only think to myself "Are there any benefits? Is this good for you?" Google, being my best friend, informed me that green tea does have a lot of benefits, especially for your skin.
Now, what are these benefits? Green tea has a ton of antioxidants which benefit your body. It has anti-bacterial and anti-inflammatory agents that can reduce acne and prevent future breakouts. In addition, studies have shown that it can actually reverse sun damage when applied topically.
Here's a tip: try green tea as a toner or put it in a spritz bottle to refresh your face throughout the day. I used green tea as a spritzer once and it felt refreshing (especially during the hot summer days!). The leaves in the tea bag can work as a gentle exfoliant as well.
There are so many benefits of green tea that not all of them could even be listed here. It goes as much as to even reduce tooth decay!
If I have not already convinced you enough, I recommend to drink a cup of green tea a day and your skin (and body!) will thank you. :)
Drink up,
Daniela

The Most Important Skin Phrase You Should Live By
It seems like everything I see in cosmetic stores nowadays looks like a bad breakout waiting to happen. The heavy foundations, the oily bb creams... I'm usually too hesitant to try them. Don't get me wrong, I've had my fair share of different cosmetics, but I always felt like my skin would get worse after a day of wearing them. About a year ago I learned the skin phrase that would save my skin forever... It's called non-comedogenic. Sounds pretty scientific, but I'll simply it for you. When a cosmetic says it's non-comedogenic, it means that it is formulated to not cause blocked pores. In other words, it won't cause pimples :) How much better can that get?
Ever since I heard of this beautiful phrase, I immediately bought myself a face lotion and bb cream that was non-comedogenic. After this change, my skin has been so much better. I think it truly is a miracle. Most people don't know what products can break you out or not, so it's important to look if non-comedogenic is anywhere on the bottle. Also, pay close attention to the ingredients. Unfortunately, not all skin products are skin friendly. Sad, sad world.
Always,
Daniela
3 Simple Steps: CTM
Pay attention people! All it takes is three simple steps to keep your skin clean and acne-free. I feel like for some people this may come as a given, but you'd be surprised on how many people forget. I call these steps "CTM". Shall we review?
STEP 1: CLEANSE SKIN (choose which face wash works for you. Check out my recommended face wash under my post "my fabulous face wash")
STEP 2: TONE (toners differ greatly so it's important to pick one that balances your skin. I recommend a toner that is alcohol free- less drying!)
STEP 3: MOISTURIZE (if you have oily skin, pick one that is oil free. Also, I recommend one that is non-comedogenic)
STEP 4 (OPTIONAL): Apply topical treatment after moisturizing to battle acne.
I know it's sometimes hard to always obey these 3 steps every morning and night, but your skin will thank you! Especially in college, it's always hard for me to make time to CTM, but I feel so much better after I do it. Imagine that your skin needs a bath just like your body does. Clean skin=happy skin. It will show too :)
CTM always,
Daniela
Subscribe to:
Comments (Atom)